[Update] (Feb 16, 2014) The process is still much the same for Mavericks, but I made a few tweaks/updates.
[Update] (Oct 8, 2012) Updated the guide for Mountain Lion, added a note about the MySQL download (and introduced a new way to install MySQL), fixed typos, and changed some markup (I'm using Markdown now).
This is meant to be a complete guide to get your up and running your own MAMP stack on your Mac (for local development), including setting up virtual hosts. This allows you to have multiple sites hosted locally on your computer.
This is the extended version to the guide. It's intention is to teach you a thing or two. If you just want a quick reference to remind you what to do, or you don't care about this "learning" thing and want to be told what to do, visit MAMP Without the App: Quick Version.
As it says in the title, MAMP is an acronym for Mac Apache MySQL PHP. Since Macs and Linux are both Unix'd based, it's a very similiar setup to the extremely common LAMP stack (where the L stands for Linux and everything else is the same).
This entire process is all done "natively" on your Mac. We will reproduce many of the core features from MAMP Pro (a popular application for getting you up and running a server locally), but for free. And you'll learn a lot along the way! As a web developer, I've noticed a lot of other devs might call themselves "LAMP developers," but they don't even know what the L and A stand for (or in our case: the first M in MAMP). I'm no Unix/Linux ninja, but by figuring out all this stuff on my own, it has greatly increased my knowledge, and in turn, increased my value as a developer.
By the end of this post, you'll:
- Turn on Apache and learn a little bit about configuring it
- Configure Virtual Hosts so you can have multiple sites locally
- Install MySQL (probably the hardest part of this process)
- Use Adminer—a super lightweight SQL database management tool
- Enable PHP and learn a bit about other Apache modules
- Configure your
hostsfile to point URLs to your Mac - Learn a few other bonus tricks!
Note: This guide was done with OSX Lion (and now updated for Mountain Lion), but when I did it for Leopard and Snow Leopard, most of it was the same, and nothing's really changed in Mountain Lion, except for what it takes to restart apache. One of the main things that's different is the contents of the original config files, so I will not be including line numbers since they aren't consistent across every OS/scenario.
Let's turn on Apache
Many of you may have already realized this, but Apache is already installed on your computer.
To turn on Apache, go to System Preferences > Sharing > Web Sharing. That's it! All you have to do is check that Web Sharing box and Apache will turn on.
For whatever reason, Apple removed this from the System Preferences. You'll not have to run the following commands in the terminal to manipulate apache:
apachectl -k start
apachectl -k stop
apachectl -k restart
apachectl -k graceful
All of those commands are pretty self explanatory, except maybe for graceful, which performs a "graceful" restart. It is the recommended way to restart apache if you are just restarting it to read in a new config or anything along those lines.
There should be something in the info when you select Web Sharing that says something like your personal address is http://LOCAL-IP/~username/ (i.e. mine is http://192.168.1.103/~cameron/).
Note: After many of the changes we make, we have to restart Apache before they take effect. The easiest way to do that is to uncheck the Web Sharing box, then wait for it to be clickable again and rechecking the Web Sharing box. For Mountain Lion: Restart apache with the graceful command. So if I say something like, "Restart Apache" somewhere else in this guide, that's how you do it!
Configuring Apache
You may ask, "Where is my Apache configuration?" I'll tell you, and I'll put it in a code block so it stands out, cuz it's important. Here's all the file locations for the files we're going to be working on for reference:
# main Apache config file
/etc/etc/apache2/httpd.conf

# virtual hosts config file
/etc/etc/apache2/extra/httpd-vhosts.conf

# hosts file for redirecting URLs to local IP (note: no extension)
/etc/etc/hosts
Note: The /etc folder is actually a symlink (i.e. alias or shortcut) for /private/etc.
Some of these files/directories may be hidden. If you need to unhide hidden files, enter the following command in the terminal:
defaults write com.apple.Finder AppleShowAllFiles YES
To make those files hidden again, just do the same command, but change YES to NO.
Or buy TotalFinder. It's main feature is tabbed browsing (which is awesome), but it brings a lot of other enhancements, like a shortcut to show/hide hidden/system files (see View menu).
Ok, now open your httpd.conf file.
My OS was installed from the Mac App Store downloadable version of Lion (a fresh install) and upgraded via the Mac App Store to Mountain Lion. It's 676 lines long. Yours may be be different (the first time I did this with my laptop pre-installed with Leopard, I swear it was much, much shorter).
Turning on PHP
Most of the Apache config can be left alone, as it is configured the way we want things. But we want to change a few things. First, let's enable PHP. It's already installed, too, so we just have to turn it on.
Of the MAMP, the 1st M (Mac) is given, the A (Apache) is working, but needs a little configuring, the 2nd M (MySQL) is later, but the P (PHP) is the simplest.
There is an Apache module called php5_module. Search for that in httpd.conf and uncomment it. Comments in Apache config files begin with a #.
Find the following line and remove the # from the beginning of that line of code.
LoadModule php5_module libexec/apache2/libphp5.so
That's all there is to turning on PHP. The next time you turn on restart Apache, you will be able to use PHP in your code! Yay team.
Bonus Info: This apache config file already detects if php5_module is enabled and will set the correct headers so that your .php are correctly handled. You can see there near the end of the httpd.conf file.
Changing the Document Root
The Document Root is where we will set up the root of our local web server. Basically, if you have a test.html in a website's Doc Root, then you access it via http://example.com/test.html.
You can set pretty much any folder as your doc root, but it would be wise to choose one that's easily accessible. I choose /Users/cameron/Sites/ since... ya know, that's where sites are. I tested to see if it would work if I had ~ in the path, and it did not work. You have to use a full path. So make sure, unless your username is cameron, that you change that to your username if you choose to do the same path as me.
There are two places that you have to change your Doc Root. There is a variable called DocumentRoot.
Change that to the path you've chosen for your Doc Root. Depending on where your original httpd.conf file came from, there may be a couple DocumentRoot variables. One of them is for something else, and the one is the one we want. The one we do not want looks like this:
# DON'T change this one!
<IfDefine MACOSXSERVER>
    DocumentRoot /var/empty
The one you want to change should say something along the lines of
DocumentRoot "/Library/WebServer/Documents"
Make note of this path, because it will help us find the other place to change.
As an example, mine now says:
The second place you have to change it is shortly after the first change. You can search for the original doc root (i.e. "/Library/WebServer/Documents"), but it's usually just a few (like 20 lines) later. It will say something like
<Directory "/Library/WebServer/Documents">
The path here must match the other one.
As an example, this is what mine looks like
DocumentRoot "/Users/cameron/Sites/"

# ... a bunch of other stuff, 20-30 lines of code

<Directory "/Users/cameron/Sites">
Enable .htaccess On a Per-Site Basis
When we create virutal hosts, .htaccess files won't work on the site level. To enable overrides as it's called, in that <Directory> node and change AllowOverride from None to All. Make sure you're in that <Directory> node!
# change 'AllowOverride None' to the line below
AllowOverride All
Other Configurations You Can Do to httpd.conf
You can change your ServerAdmin variable (see in-document comments).
You can change your options for that <Directory> node (see in-document comments).
Setting up Virtual Hosts
First thing we gotta do is make sure our httpd.conf will include our httpd-vhosts.conf file. To do so, in our httpd.conf file, uncomment the following line:
Include /etc/etc/apache2/extra/httpd-vhosts.conf
The actual httpd-vhosts.conf is a little more straight forward to configure than our httpd.conf file was. First off, let's open up our httpd-vhosts.conf file.
We want to set UseCanonicalName to Off and set up our VirtualDocumentRoot to be our Document Root with %0 on the end (I believe it acts as a wild card). Mine has a couple other options (my log preferences), but is still only 4 lines long:
UseCanonicalName Off
VirtualDocumentRoot /Users/cameron/Sites/%0
LogFormat "%V %h %l %u %t \"%r\" %s %b" vcommon
CustomLog /var/log/apache2/access_log vcommon
What are the benefits of setting up Virtual Hosts?
Basically, if we create a folder called example.test in our Doc Root and place an index.php file that says echo "Hello World!"; in this folder and there is a matching entry in our hosts file, then when all we have to do is go to http://example.test in our browser, we will see
Hello World!
Pretty neat, eh?
Bonus Info
As an alternative to the code above, I could set up one site at a time. This gives me more control over all of the options, but I prefer doing it the way above, because all I need to do is create a folder and it's ready to go. If you have used WHM to create a website, typcially it will create an entry like this one for every site on your server.
I'm not going to go into great detail about each option, but I did add a few comments.
NameVirtualHost *:80

<VirtualHost *:80>
    # Required... otherwise it doesn't know where to start
    ServerName cameronspear.cam

    # Override the ServerAdmin for this site
    ServerAdmin cam@cameronspear.com

    # Required. Note I can have the folder be called anything
    # I want instead of having to make it be cameronspear.cam
    DocumentRoot "/Users/cameron/Sites/cameronspear"

    # point www. to the same folder as non-www
    ServerAlias www.cameronspear.cam

    # when this site has logs something, let's put it in its own unique file
    ErrorLog "/etc/var/log/apache2/cameronspear.cam-error_log"
    CustomLog "/etc/var/log/apache2/cameronspear.cam-access_log" common
</VirtualHost>
hosts File
We don't have MySQL installed yet, but I'm going to put this section in here first. If running Lion or before, go ahead and make sure Web Sharing is enabled in System Preferences. If when you check it, it stays greyed out and then automatically unchecks, there may be an error in your httpd.conf file. You can check your Console to see what might be the issue. It should even tell you the line number. Sometimes, it just needs a rest period between shutting down and starting back up, so give it a few seconds if nothing seems to be wrong and try checking the box again.
If you're running Mountain Lion, when you try to restart Apache via the command line, if something's wrong, you will get an error in the terminal.
Alright, so open your hosts file. You'll see some stuff already in there. Do not mess with that stuff.
Add a line at the end of the file and for any entry that you'd like to add, the format is 127.0.0.1 domain.test. One per line (you can actually put multiple space delimited domain names after the IP address on one line). Because we're going to use it later in this guide, go ahead and create the following entry:
127.0.0.1 database.test
127.0.0.1 is a specially reserved local IP that always points to your own computer. So that's why we're using that. You don't need to look up your router's IP, or forward any ports or whatever, just use that exact IP and we're good.
Important Note: You can use whatever you want for your local domains. But I wouldn't use just anything. For example, just because you can, do not use .local addresses. .local is used by the Mac OS (for Bonjour or whatever) and as such, starting with Lion, it tries to resolve that before it looks in your hosts file. There are reports that it can take up to 30 seconds longer for pages to load. It's also unwise to use .com or .org or something that is already taken.
In fact, only a couple top level domains (TLD) as they are called are "safe" to use. .test is one that will never be used as a TLD, so it's "safe" to use (there are some reasons that it may not be okay, but it's beyond the scope of this guide). As such, that's why I'm using .test in this guide.
MySQL
Unlike all of the other steps, MySQL is not pre-installed on you Mac.
The MacPorts Way
[Update] I recently discovered the package manager MacPorts, and I love it for keeping certain packages and such up to date, and as it turns out, it's a much simpler way to install MySQL.
If you don't have MacPorts installed, you can go to the the MacPosts install page and download the "pkg" installer for your system and install MacPorts.
Note that there are some prerequisites for running MacPorts, and you have to have Xcode installed with Command Line Tools installed. If you don't want to mess with all that, skip ahead a little and you can download it the "hard" way.
Once MacPorts is installed, all you have to do is run:
sudo port install mysql
Homebrew is better. Run:
brew install mysql
from the terminal and it should do everything for you, including making it so MySQL starts up for you on reboot, etc.
The Hard Way
If you don't want to go the MacPorts route, go to MySQL's download page and find a download for your version of Mac (if it says 10.6, it will work in 10.7 and 10.8, too the version may not match your system's version exactly, but just grab the closest one and it should work fine).

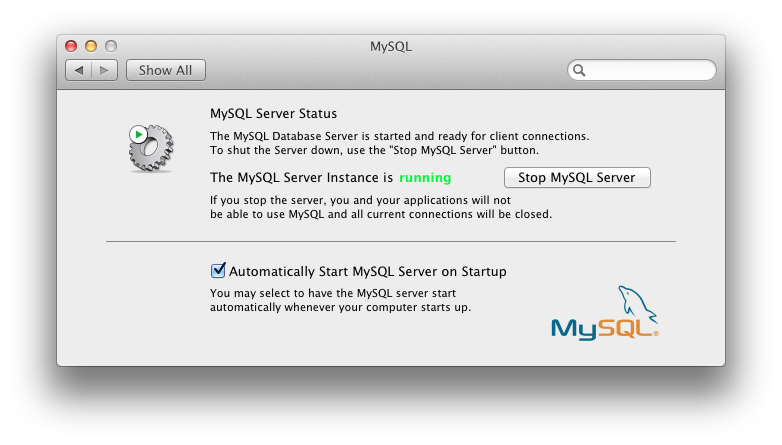
Unfortunately, you have to create an account. A buddy of mine pointed out that you can skip the create an account part if you follow the link underneath the signup. But once you get that all done, it downloads and you install it, it will install a panel on your System Preferences, and it will allow you to start and stop your MySQL server and it will allow you to have an option to have it start MySQL when you start your computer (recommended).

Adminer
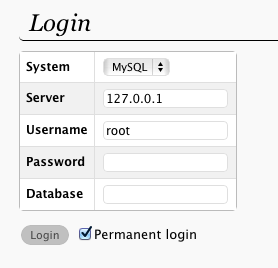
Adminer is a great lightweight SQL database management tool. Visit the Adminer download page and download Adminer (I download the MySQL English only version because it's extra lightweight).
Download whatever version you want, rename it index.php and create a folder called database.test in whatever folder your designated to be your Doc Root and place Adminer (renamed to index.php) into that folder. Now, since we created an entry in our hosts file, if we go to http://database.test we should see the log in for Adminer. The default MySQL username is root with an empty password. Set the server to blank or 127.0.0.1. localhost may not work for some reason.
It's pretty straight foward. You can create databases and tables in Adminer and it's a lot faster than phpMyAdmin.
Conclusion
To create a new local site, all you have to do is create a folder in your Document Root and add an entry in your hosts file. You're now running a full MAMP server. You can have multiple sites running at different domains, full web apps, CMSes, etc. That's all there is to it.
I hope you learned something. If you need a refresher, or are setting this up again and just want to be told what to do instead of reading all that pesky, "why?" stuff, visit the quick reference version of this post: MAMP Without the App: Quick Version.